


Fresh chicken manure can become a headache faster than many farmers expect.
Leave it in a damp corner for a few days, and the ammonia smell gets stronger. Flies gather. Then heavy rain arrives, washing dirty runoff toward nearby drains.
For poultry farms in the Philippines, Indonesia, and Malaysia, keeping manure dry during the rainy season can be a challenge in itself.
So, how do you treat chicken manure properly?
Start with regular collection, get the moisture and carbon balance right, maintain good aeration, and check the material before using it as fertilizer. The equipment helps, but daily management makes the real difference.
Step 1: Collect Manure and Keep Rainwater Out
The first job starts inside the chicken house.
In commercial layer farms, manure belts beneath H-type cages can remove droppings regularly. This limits accumulation beneath the birds and makes it easier to move manure to a central treatment area.
Broiler farms work differently. Droppings are mixed with rice husks, wood shavings, or other bedding materials. Farmers usually remove this litter between growing cycles.
That difference matters. Fresh layer manure and used broiler litter won’t behave the same way during composting.
Once collected, manure should be moved to an area with:
- A roof or reliable rain protection
- A hard, suitably impermeable floor
- Drainage to collect contaminated runoff
- Enough access for loading and cleaning equipment
One practical warning: don’t let clean rainwater flow into manure storage. Every extra litre becomes water you may need to manage later.
For belt-equipped houses, use a cleaning schedule that matches manure accumulation and downstream treatment capacity.
If you’re planning equipment around your flock size, our companion article, Chicken Manure Treatment Solutions for Small, Medium, and Large Poultry Farms, explains how to compare treatment setups.
Step 2: Get the Moisture and Carbon Balance Right
This is where many composting problems begin.
Chicken manure contains plenty of nitrogen, but microorganisms also need carbon and oxygen. Wet manure packed tightly into a pile can quickly develop oxygen-starved areas.
The FAO’s On-Farm Composting Methods describes approximately 40–65% moisture as a workable range for composting materials and suggests starting many piles at around 50–60%.
For fresh layer manure, targeting roughly 55–60% after adding suitable bulking materials may be a reasonable starting point for conventional composting. It isn’t a universal requirement for enclosed equipment.
Farmers can use:
- Rice husks
- Chopped straw
- Wood shavings
- Other clean, carbon-rich materials
Rice husks are particularly useful in rice-growing areas of Southeast Asia. They help create space for airflow, although they break down slowly.
Try the hand-squeeze test.
Grab a handful of mixed material and squeeze. If water drips between your fingers, it’s probably too wet. If it feels dusty and falls apart immediately, it may be too dry.
Don’t rely on this test alone. For commercial batches, measure moisture whenever possible.
A carbon-to-nitrogen ratio around 25:1–30:1 is a reasonable starting target for many composting mixtures.
But don’t copy another farm’s manure-to-sawdust recipe blindly. Feedstock conditions vary.
Step 3: Choose an Aerobic Composting Method
Once the mixture is prepared, the next job is keeping oxygen moving through it.
Windrow Composting
Windrow composting uses long piles of manure mixed with suitable bulking materials.
A compost turner or other equipment periodically mixes the pile, introducing oxygen and redistributing moisture and heat.
The attraction is simple: relatively basic machinery and room to expand.
The drawback is space. In tropical areas, an uncovered windrow can become difficult to manage after several days of rain.
And don’t leave the pile untouched for too long. Wet, compacted material may develop anaerobic pockets and unpleasant odors.
Trough / Groove-Type Composting
This method uses concrete composting channels and mechanical turning equipment.
A turning machine travels along the troughs, mixing the material and helping maintain aeration.
It’s a practical arrangement when manure arrives regularly and manual turning becomes difficult.
You’ll still need ventilation, drainage, and somewhere to put the material during curing.
Enclosed Vertical Fermentation
An enclosed fermentation tank offers another option where available space and odor management are major concerns.
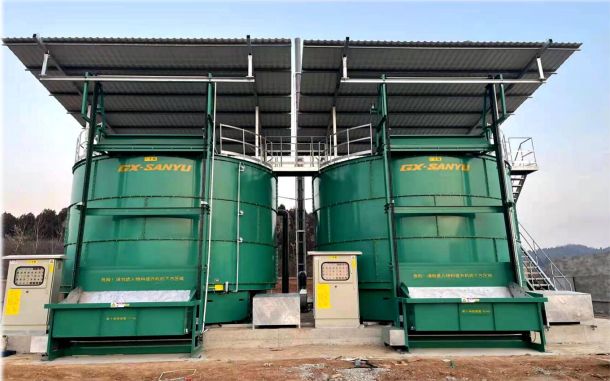
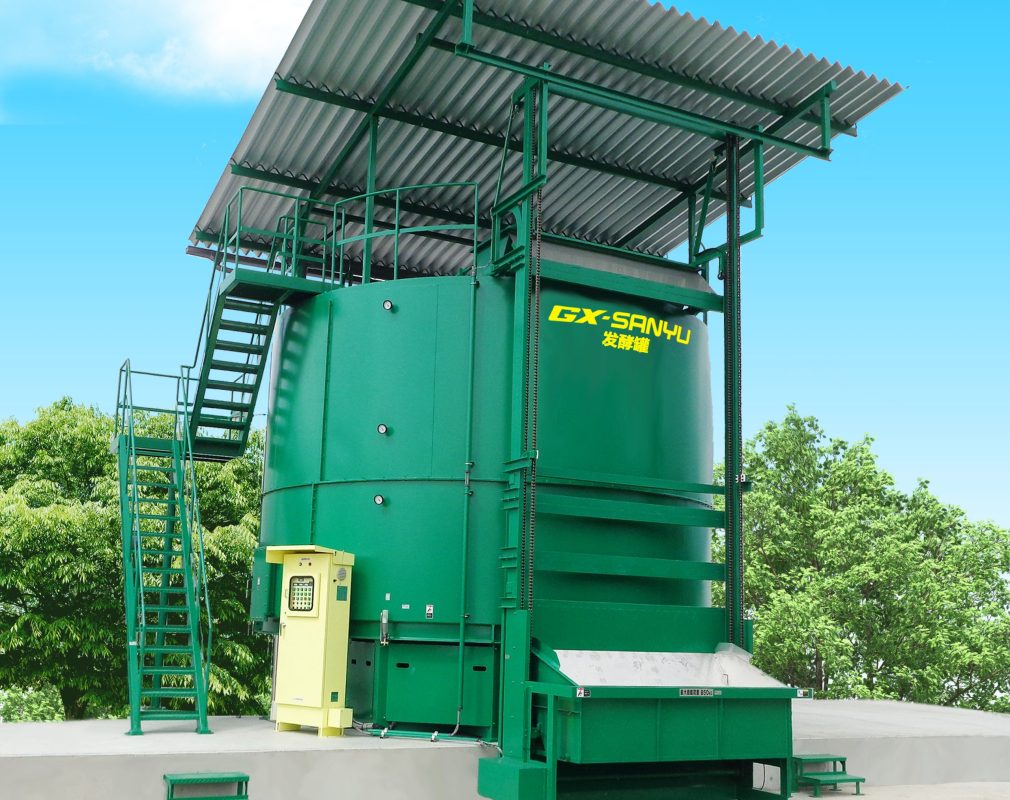
The Guangxing 11FFG-100 Vertical Poultry Manure Composting System uses mechanical mixing, forced aeration, temperature control, and exhaust management inside a vertical vessel.
One reference is Guangxing’s 920,000-layer manure treatment project, which uses ten 11FFG-100 fermentation units.
Its published operating data includes incoming manure moisture of 65–70% and a typical fermentation cycle of approximately seven days.
Those figures describe that project’s operating conditions. They shouldn’t be used as a general guarantee for every farm.
The seven-day figure refers to the reported fermentation cycle, not necessarily the time required to produce fully mature, market-ready fertilizer. Further curing or testing may still be needed.

Step 4: Watch Temperature, Airflow, and Odor
You don’t have to guess whether your compost is working. The material gives you clues.
As microorganisms break down organic matter, the pile heats up. Active composting often reaches temperatures around 55–65°C.
But one hot reading doesn’t tell the whole story.
Reducing pathogens requires suitable temperatures, sufficient exposure time, and proper treatment of the entire batch.
For example, US organic composting rules specify different temperature-holding and turning requirements for in-vessel systems and windrows. These are useful technical references, not regulations that automatically apply to Southeast Asian farms.
For windrows, measure temperatures at several points and depths. Record turning dates.
With enclosed equipment, check temperature readings, mixing, aeration, and exhaust operation.
Smell is another warning.
A strong ammonia odor may signal nitrogen loss or an unsuitable mixture. A rotten smell often points toward excessive moisture or poor oxygen supply.
Don’t rush to add fermentation additives every time something smells wrong.
Check moisture and airflow first.
For further technical details, see the FAO guide to on-farm composting methods.
Step 5: Cure the Compost Before Using It
Compost coming straight out of a fermentation tank or hot windrow is not automatically crop-ready.
It may still be biologically active.
During curing, the material continues to stabilize. Keep it in a protected, suitably ventilated area. Avoid adding fresh untreated manure to a batch that is already maturing.
If compost heats up strongly again after turning or moistening, decomposition may still be active.
That’s a useful warning, not a complete maturity test.
Before using or selling the material, check the relevant maturity, moisture, hygiene, and fertilizer quality requirements.
Poorly matured manure can damage sensitive roots or continue decomposing after application.
Once properly treated, compost may be used on farmland, supplied to local growers, or processed further into commercial organic fertilizer.
Common Chicken Manure Composting Problems
Sometimes a batch goes wrong even when the equipment is working. Start with a few basic checks before making major changes.
| Problem | Possible cause | What to check |
|---|---|---|
| Strong ammonia smell | Nitrogen loss or poor C/N balance | Carbon materials, mixing, aeration |
| Compost does not heat up | Low moisture, small pile, poor mixture | Moisture, pile structure, temperature records |
| Wet, black material with rotten odor | Lack of oxygen or excess moisture | Drainage, compaction, airflow |
| Persistent flies | Exposed fresh manure or poor storage | Covering, cleaning, pest control |
| Compost heats again after discharge | Incomplete stabilization | Curing conditions, maturity testing |
Here’s one mistake to avoid: adding water to a cold pile without checking moisture first. If the centre is already wet and compacted, more water will make matters worse.
Final Thoughts
Good chicken manure treatment isn’t complicated in principle. The difficult part is keeping it consistent when fresh manure arrives every day.
Keep rainwater out. Prepare a mixture that can breathe. Monitor temperature, and don’t confuse active fermentation with finished compost.
For farms considering automatic manure handling or enclosed fermentation, the system should fit the actual manure conditions and treatment requirements.
Planning a poultry manure treatment project?
Contact Guangxing for capacity calculation, site layout design and quotation.
Share your poultry capacity, manure collection method, daily manure quantity, moisture content, and available installation space to help us evaluate a suitable solution.
2 thoughts on “How to Treat Chicken Manure on a Poultry Farm: A Step-by-Step Guide”